
Great news! Points North Certified Payroll Reporting (CPR) can now handle multiple paychecks for the same employee in the same pay period.
Before this update, if an employee had more than one check in a week, you had to add up all the numbers yourself and type in one big total. That was a lot of extra work — and easy to make mistakes!
Now, you can enter each check one at a time, and the system does all the math for you for your certified reports.
|
💡 Good to know: This works whether you enter checks by hand or if you sync checks from your payroll system (when your integration supports multiple checks). |
What's New on the Page?
You may notice the page looks a little different than before. Here's what changed and why:
- The check summary has moved to the right side of the page. This keeps it easy to see as the page gets longer when you add more checks.
- The check number and check date now appear at the top of the check. This makes it easier to know which check you're looking at.
- Check Number
- Check Date
- Gross Pay
- Any deductions for that check
- Save and Next — Move to the next employee or the next week.
- Save and Done — Save your work and go back to the CPR homepage.
Your hours and rate information are now on the left! The page still functions for entering this information as it did before.
Where Do I Find This?
Here's how to get to the right place in CPR:
- Go to your Certified Payroll Reporting Homepage.
- Click on the pay period end date you want to work on.
- Click Data Entry, found under the Weekly Processing menu.
- Find the check you want to remove.
- Click the Delete button at the bottom of that check's column.
- A pop-up will ask you to confirm. Click OK to delete it.
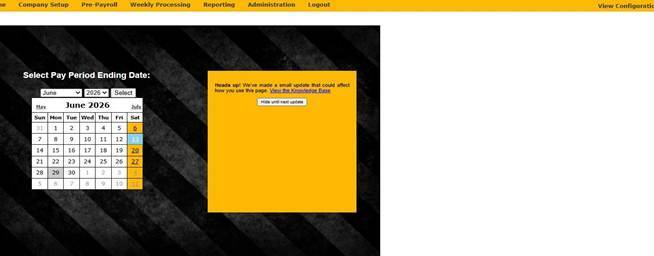
Step 1–2: The CPR Homepage. Select your pay period end date from the calendar.
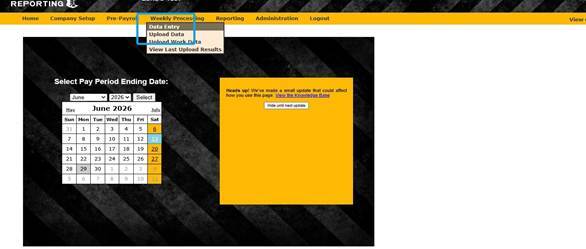
Step 3: Click Weekly Processing in the top menu, then select Data Entry.
How to Add Multiple Checks
Step 1: Enter or Sync Your First Check
If your first check for an employee is not already showing, go ahead and enter it. Once it's saved, you'll see a new button appear in the upper right — Add Check.
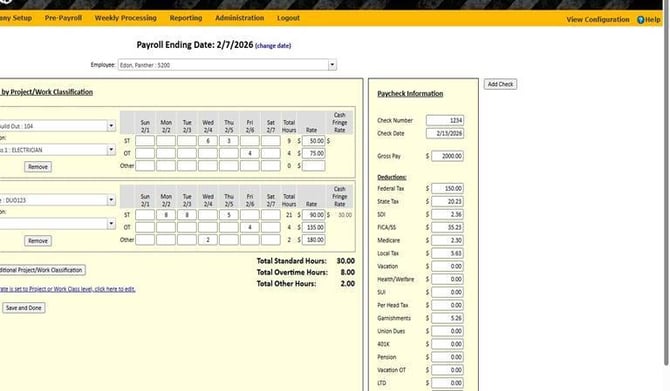
The Data Entry page with the first check filled in. Notice the Add Check button in the upper right corner.
|
💡 Using a payroll integration? If your payroll system is connected to Certified Payroll Reporting and your integration supports multiple checks, you can run a data sync to automatically pull in all checks for that pay period. You won't need to enter them by hand! |
Step 2: Add Your Next Check
Click the Add Check button. A new Paycheck Information column will appear on the right side of the page, ready for you to fill in.
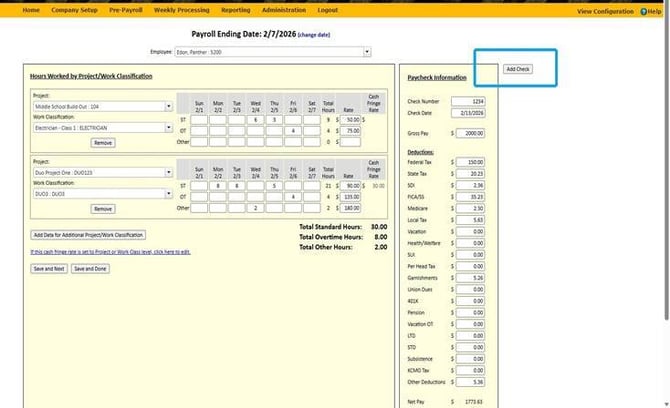
Click the Add Check button (highlighted) to add a second check for the same employee.
Fill in the following information for the new check:
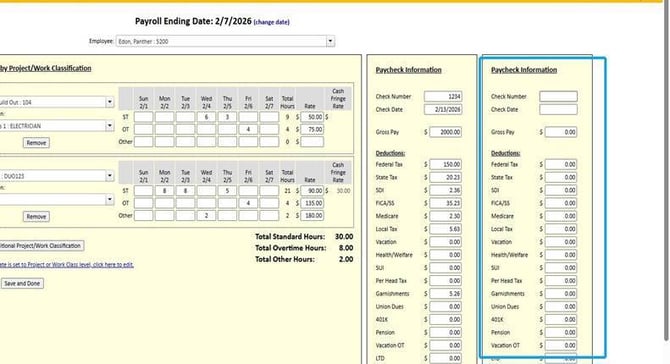
After clicking Add Check, a blank second check column appears on the right. Enter the check details here.
If your account uses granular deductions, a pop-up will appear so you can enter those just like you normally do.
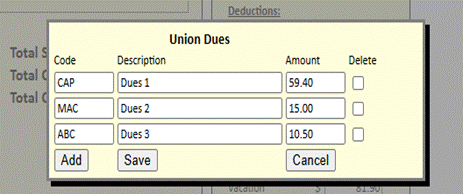
Granular deductions pop-up — enter each deduction line by line, then click Save.
When you're done filling in the check details, click Save at the bottom of the Paycheck Information column.

Click the Save button (highlighted) at the bottom of the new check to save your entries.
Step 3: Keep Adding Checks (If Needed)
After you save your second check, the Add Check button will still be available. You can keep clicking it to add a third, fourth, or more checks for the same employee in that pay period.
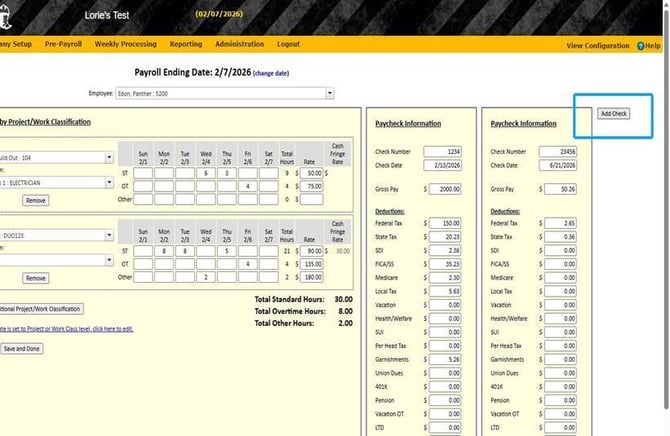
Two checks saved side by side. The Add Check button is still available to add more.
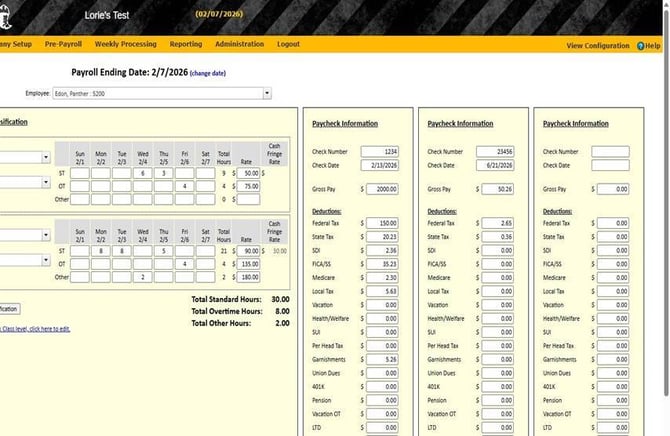
Three checks showing side by side.
Step 4: Finish Up
Once all your checks are saved and your hours and rates look good, use these buttons at the bottom left to wrap up:
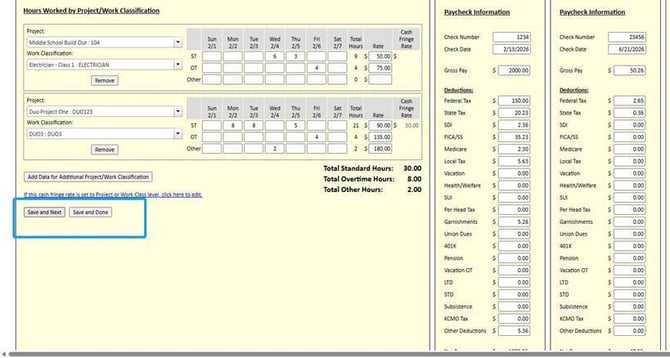
Use Save and Next or Save and Done (highlighted) to finish up when all checks are entered.
How to Delete a Check
Made a mistake? No problem. Here's how to remove a check:
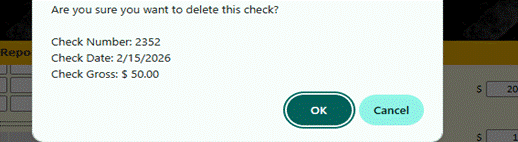
A confirmation pop-up will appear before deleting. Click OK to confirm, or Cancel to go back.
|
💡 Heads up: If you delete a check that came from a payroll sync, it will come back if you re-sync your data for that pay period. If you don't want it to return, just don't re-sync that period. |
Frequently Asked Questions (FAQs)
|
❓ Why does my page look different? Don't worry — everything still works the same way you're used to! We made a few updates to help the page work better now that it can show multiple checks at once. Here's what changed: the paycheck summary moved to the right side of the page, so the page has room to grow as you add more checks. The check number and check date now appear at the top of each check so it's easier to tell them apart. |
|
❓ Why are there extra Save buttons on the page now? We added extra Save buttons to fix a long-standing issue where some users had trouble saving their work on this page. Now it's much easier to save without losing anything. You'll notice separate Save buttons for your work data and your paycheck data. This gives you more control over what gets saved and when. |
|
❓ I see checks with $0.00 — what are those? $0 checks are expected when your account is connected to a payroll integration. They come from the way some payroll systems store check records. They will not change your reports, but you can safely delete them using the Delete button if you do not want to see them. They will not come back unless you re-sync your data for that pay period. |
|
❓ Will reimbursement checks show up too? Yes! If your payroll system sends reimbursement checks, those will appear in CPR as well. Reimbursement checks usually show $0 in gross pay, but they will reflect the reimbursement amount paid to the employee. |
|
❓ What if I enter the wrong check information? No problem! After saving a check, you can edit it or delete it at any time before you finalize the pay period. Use the Delete button to remove it or click into the check fields to make corrections. NOTE: You will not be able to edit the check number of check date. If one of those fields is incorrect, you will need to delete and re-enter the check. |
|
❓ Can I still add checks by hand if I don't use a payroll integration? Absolutely. You do not need a payroll integration to use multiple checks. Simply enter your first check as usual, then click Add Check to enter each additional check manually. |
|
❓ I use an importer to bring in my paycheck data. Can I import multiple checks? Not yet — but don't worry, you can still get your data in! Right now, importers can only bring in one check per employee per pay period. If an employee has a second (or third) check, you will need to enter those additional checks by hand using the Add Check button. Your first check will still come in through your importer as usual. We know this is an extra step, and we are working to support multiple check imports in the future. |
|
❓ What's the difference between "Save and Next" and "Save and Done"? Save and Next moves you to the next employee or the next week — great when you have many entries to work through. Save and Done saves your work and takes you back to the Certified Payroll Reporting homepage — use this when you're finished entering data for the day or pay period. These buttons will still save any changes you make to paycheck details. |
|
❓ How do I share feedback about the changes to this page? We'd love to hear from you! Please submit your feedback on the multiple checks feature, or on the product overall, using our feedback form: Points North Certified Payroll Reporting - Product Feedback Form – Fill out form. |